Hooray Fireworks! Happy Canada Day and to those friends celebrating July 4, enjoy your holiday! Hope you have a little time for sewing!
Thursday, June 30, 2011


Thursday, June 23, 2011


Thursday, June 9, 2011
classes with descriptions

Linen Pillow with 3 Dimensional Flowers
Machine Embroidery can add such flair to home decor. Embroider this Jenny Haskins design on linen then add organza flowers for a whimsical touch. Complete the cushion with some of those seldom used decorative stitches on the sewing machine and you’ll have a lovely decor item for any room in your home. June 7 10-2 Encore Saturday June 11 12-4 pm Class $30, kit and design $20
Town and Country Tote
Everyone needs a sizable and classy looking tote. This one is great for a day of shopping or sightseeing. Every detail has been thought out from the comfortable handles to the multiple pockets, leather bottom and secure zipper closures. Add machine embroidery to make an original one of a kind for you or it would make a wonderful gift! June 14 10-2 Encore June 18 12-4 Class $30 kit fee $20.
Serger Jacket
Made of Cotton and reversible this will be a favourite for cool summer evenings or the Fall. The hardest part of this jacket will be chosing the fabrics! Use decorative threads and the Baby Lock serger for amazing results! June 15 1-5 Class $30 plus fabric.
Expect the unexpected! You never know what you will see when CQA Juried Show Winner Stasha Ceglarz combines colour and technique but it will be fabulous and inspiring! Book your spot for our Trunk show on June 21 7-9pm and you will receive a coupon for $10 off any purchase that evening. Book soon, this is sure to be a crowd pleaser! ($10 to register)
Wednesday, June 8, 2011
Class Calender for June

Sunday, May 15, 2011
Finally some sewing for me!
Pattern Sizing:
Size XL
Did it look like the photo/drawing on the pattern envelope once you were done sewing with it?
No picture but did see one just like it while shopping.
Were the instructions easy to follow?
If you've made a skirt or two you know how easy they can be.
What did you particularly like or dislike about the pattern?
Fabric Used: This is a Polyester with a linen look weave from Sew Have Fun. It has a fair bit of weight but I'll need a little slip because the light shines through. I have plans to make one of 100% cotton voile which will help keep me cool.
Pattern alterations or any design changes you made:
Made a wedge shape, 4 inches at the waist, 9 inches at the hem with the grain line running down the center. Cut the center back with a seam allowance. 10 Gores in all. Length 27"
Would you sew it again? Would you recommend it to others?
I think I will make it again, it sewed up pretty quickly.
Conclusion:
Love the black and white and motion in the print, will be a regular for my summer wardrobe!

Saturday, April 9, 2011
Technology in Sewing

Thursday, March 31, 2011
New Class Calendar and more ways to be creative!


Tuesday, February 22, 2011

Friday, January 14, 2011


Tuesday, August 31, 2010
Celebrate September!
“It’s the most wonderful time of the Year” the jingle of a T.V. commercial has us rolling our eyes and wanting to cling to what is left of the summer holidays before we get back to the routine of school lunches and work schedules. I’m so glad Labour Day is late this year; it gives us a few more days and one more long weekend to enjoy and get ready for back to school.
To celebrate all Wonderfil Thread is Buy One, Get One Half Price! Serger thread is 50%off. There are new Upholstery Ends including woven Chenilles and Tapestry, perfect for some cushions or covering those dining room chairs. Lida Biday fashion fabrics are 50% off and now is the perfect time to get that quilt finished with ½ price extra wide backing for quilts.
Once summer is over many of us want to get back to the sewing room and nothing is nicer than starting fresh with a brand new sewing machine! Come in and check out the amazing prices on the Quilter’s Choice, Decorator Choice and Espire. Sergers are on special, too and Owner’s classes are FREE with your purchase of a Baby Lock Sewing Machine or Serger.
This week at Sew Have Fun
Thursday Sept 2, Fashion and Fitting, is making pants a pain in the butt? Let’s get down to the nitty gritty and learn some pants fitting tips so that when it comes time to wear pants we’ll be ready!
Tuesday, September 7, Quilt as You Go, Straight Out of Line 10-1.
Wednesday, Sept 8, Serger quilt 10-1
Thursday, Sept 9, Serger night 7-9, using the serger to gather and ruffle.
Many more classes on the schedule, drop in or call to book your spot!
Looking Forward to seeing you soon,
Edith
Sew Have Fun
905-728-7397
www.sewhavefun.ca
p.s. Don’t forget to set aside Thursday, Sept 23. Trunk Show by Brenda Sutherland, 7-9pm

 New arrivals of Fabric:
To celebrate all Wonderfil Thread is Buy One, Get One Half Price! Serger thread is 50%off. There are new Upholstery Ends including woven Chenilles and Tapestry, perfect for some cushions or covering those dining room chairs. Lida Biday fashion fabrics are 50% off and now is the perfect time to get that quilt finished with ½ price extra wide backing for quilts.
Once summer is over many of us want to get back to the sewing room and nothing is nicer than starting fresh with a brand new sewing machine! Come in and check out the amazing prices on the Quilter’s Choice, Decorator Choice and Espire. Sergers are on special, too and Owner’s classes are FREE with your purchase of a Baby Lock Sewing Machine or Serger.
This week at Sew Have Fun
Thursday Sept 2, Fashion and Fitting, is making pants a pain in the butt? Let’s get down to the nitty gritty and learn some pants fitting tips so that when it comes time to wear pants we’ll be ready!
Tuesday, September 7, Quilt as You Go, Straight Out of Line 10-1.
Wednesday, Sept 8, Serger quilt 10-1
Thursday, Sept 9, Serger night 7-9, using the serger to gather and ruffle.
Many more classes on the schedule, drop in or call to book your spot!
Looking Forward to seeing you soon,
Edith
Sew Have Fun
905-728-7397
www.sewhavefun.ca
p.s. Don’t forget to set aside Thursday, Sept 23. Trunk Show by Brenda Sutherland, 7-9pm


Friday, August 27, 2010
Magazines Burda Style
Just a quick note, the latest edition of “A Needle Pulling Thread” has arrived and as always there are fabulous articles and ideas. While you’re at it the latest Burda Style is here with some interesting outfits perfect for back to school.
Past copies of Burda Style are available at the store for a discount!
Looking Forward to seeing you soon,
Edith
Sew Have Fun
905-728-7397
www.sewhavefun.ca
Past copies of Burda Style are available at the store for a discount!
Looking Forward to seeing you soon,
Edith
Sew Have Fun
905-728-7397
www.sewhavefun.ca
Sunday, August 22, 2010
"Sew Cool" "Young Designers" "Sewcial"
 |
| A Special Sewing Student! |
This time of year always brings a sense of sadness and anticipation. For the kids summer vacation is almost over but there is the excitement of the coming school year and all the unknowns...the next grade in school, new friends, and new experiences. The grown-ups look back and see the accomplishments or lack of them; I know I always start the summer with a big to-do list. And now the days are getting shorter some leaves are even starting to turn and we are going to pack as much as possible into the remaining days of vacation.
I hope for some of you that includes some sewing! The Lida Baday Collection fashion fabrics are on sale 50% off, perfect for a new fall outfit. Fall and Christmas fabrics are arriving so come in before they slip away! As many of you know once these are gone we won’t be able to get more. Our September schedule is ready so sign up for a class, we have something for everyone!
“Sew Cool” and “Young Designers” are weekly sewing classes for young people. Pre-registration is Tuesday August 24 from 6-7:30pm. Is there someone you know who would love to learn to sew? Come in and check out some of the sewing projects.
August 26 7pm “Sewcial” Join us for a fun and informative evening as we challenge each other to participate in a S.W.A.P. sewing with a plan, and demonstrate how to make a Full Bust Alteration on different styles of patterns. Call to register.
Looking forward to seeing you soon,
Edith
www.sewhavefun.ca
905-728-7397
Saturday, August 21, 2010
New Look 6779

Pattern Description: New Look Easy Dress
Pattern Sizing:This is a multisized pattern sizes 10-22
Did it look like the photo/drawing on the pattern envelope once you were done sewing with it?What I really wanted was the yoke and a A line dress so the silhoette is there but my dress does't really look like the pattern
Were the instructions easy to follow?Instructions were ok but I veered from the path right from the start as I lined the dress and didn't use the facings.
What did you particularly like or dislike about the pattern?
 I was looking for an A Line dress with yoke because I was inspired by a dress while window shopping.
Fabric Used:
Polyester knit from Sew Have Fun
Pattern alterations or any design changes you made:
Pattern alterations? Where shall I start...first the measurements, had I made the dress according to my measurements I would have cut the 22, I cut the 18. New Look is probably the worst offender when it comes to grading for larger sizes...who has 18" shoulders?!! I should have made a full bust alteration before I rotated the dart and turned it into a princess line dress but the dress is full enough below the yoke so it is ok. I traced the dress front and back, cut it apart and added seam allowances. The back yoke was still too big so I cut it apart and added a button and loop closure. Not needed as the dress slips over my head but it took care of the extra fullness in the back yoke. The front yoke is still a little big, there is a pooch of extra fabric at the neckline which I think would be solved by folding out a dart at the neckline on the pattern.


Would you sew it again? Would you recommend it to others?
I don't think I'll make this again but I will not be afraid to rotate darts and make alterations. I don't think I could recommend this unless you are prepared to check all the measurements and make adjustments. It's a lot of work for a simple dress.
Conclusion:
I'm ok with the out come, not as formal as the inspiration dress as the hem is coverstitched and a little short but I like the red and the cording look on the seams.
Saturday, August 14, 2010
A new look for a new era!!
A new era where I promise to blog more than I have been doing! I have been sewing...so much that I have had no time to blog or do much of anything else. Sewing forever...housework whenever! I will take pictures of the New Look dress I recently made and post a review on pattern review as well. New Look patterns were on sale at my local fabric mart and this dress reminds me why to pass them by! I will explain when I post pictures.
For now I just want to say that I have missed reporting on myself and will get back into the habit.
For now I just want to say that I have missed reporting on myself and will get back into the habit.
Friday, May 14, 2010
"Self drafted" skirt
Summer's coming, I know it and when it does this skirt will be great with a tank or at the beach with a bikini top. Here's how I did it:
 My fabric is 60" wide so I cut 60" (1.5m). I trimmed off the selvages.


I folded it twice and placed the corner with the folded edges closest to me. I used my tape measure and measured a waist measurement. (7x4 layers = 28") Cut off and divide into quarters, mark with pins or a marker. This really stretches so if you have a tiny waist I'd make that measurement smaller by about 20%.

I cut a waist band 4 inches wide by 28" long. Seam the short ends right sides together and fold wrong sides together. Mark the quarters with a pin and match the pins to the main body of the skirt. You want to place the seam of the waistband to the back of the skirt and for me I wanted the points of the skirt to be front, back and sides. You could place it differently but I think this is the most flattering for everyone.

Here you see the waist band and waist of the skirt pinned together. I sewed this on a serger and the big thing to remember is that sergers don't sew over pins so you must pull them out before you damage your machine!
I sewed an elastic into the seam as I sewed the waist band on and I'm glad I did as this knit is weightier than I thought. I roll hemmed the hem of the skirt and there you have it, an easy summer skirt, it will pack easily for a cruise, too!

If you were adventurous you could wear this above the bust, just another option!
I've Been Sewing Too!
Pattern Description:
Top with gathered bust section.
Pattern Sizing:
34-44 (I graded it up to a 46 and did a FBA)
Did it look like the photo/drawing on the pattern envelope once you were done sewing with it?
Yes, it does look like the pic.
Were the instructions easy to follow?
I looked at the instructions and made a couple of changes because of using the serger and coverstitch so that everything flowed more logically.
What did you particularly like or dislike about the pattern?
 This was an easy top to make and I like the flattering neckline, however it was a little too revealing for me. I obviously didn't read the whole discription, "A cowgirl can also show off her figure in such a bright ring-striped top with gathered bust section to attract a suitable cowboy!" As I previously mentioned I did a full bust alteration so I don't want to show off! I think with a little more alteration I can bring in the neckline so that my brastraps won't show.
Fabric Used:
A lovely light-as-air knit from "Sew Have Fun". Should have used a narrow coverstitch as the hem puckered just a little.
Pattern alterations or any design changes you made:
Graded up to a 46 and did a full bust alteration to the bust portion. You can see how I do a FBA http://sewhavefun.blogspot.com/2010/01/does-it-take-2-weeks-to-make-5.html
Would you sew it again? Would you recommend it to others?
I think once I make the changes I will sew it again.
Conclusion:
This will make a great little summer top for when the hot weather really arrives.
Top with gathered bust section.
Pattern Sizing:
34-44 (I graded it up to a 46 and did a FBA)
Did it look like the photo/drawing on the pattern envelope once you were done sewing with it?
Yes, it does look like the pic.
Were the instructions easy to follow?
I looked at the instructions and made a couple of changes because of using the serger and coverstitch so that everything flowed more logically.
What did you particularly like or dislike about the pattern?

Fabric Used:
A lovely light-as-air knit from "Sew Have Fun". Should have used a narrow coverstitch as the hem puckered just a little.
Pattern alterations or any design changes you made:
Graded up to a 46 and did a full bust alteration to the bust portion. You can see how I do a FBA http://sewhavefun.blogspot.com/2010/01/does-it-take-2-weeks-to-make-5.html
Would you sew it again? Would you recommend it to others?
I think once I make the changes I will sew it again.
Conclusion:
This will make a great little summer top for when the hot weather really arrives.
Saturday, May 1, 2010
At last, my long absence explained
Hi friends, I'm sure some of you thought I fell off the planet, but I'm back! I've been here all along, reading your posts and blogs and gathering as much info as I could on building your own business from scratch! And so now here I am, Sew Have Fun has grown into the real deal, storefront and all. It's been quite a journey, one I'm not sure I would want to repeat, but some of it, yes, and of course hind sight is 20/20 so are there things I might change.
So here we are, I'm in my store, waiting for customers who love sewing as much as I do! A few have been trickling in, I'm waiting for the flood! Just like Noah, but I hope I don't have to wait 100 years.
Here is a great list I'd like to share.
Everything I need to know I learned from Noah
Plan ahead. It wasn't raining when Noah built the ark.
Stay fit. When you're 600 years old, someone might ask you to do something REALLY big.
Don't listen to critics. Do what has to be done.
Build on the high ground.
For safety's sake, travel in pairs.
Two heads are better than one.
Speed isn't always an advantage. The cheetahs were on board, but so were the snails.
If you can't fight or flee--float.
Take care of your animals as if they were the last ones on earth.
Don't forget that we're all in the same boat.
When the doo-doo gets really deep, don't sit there and complain--shovel!
Stay below deck during the storm.
Remember that the ark was built by amateurs & the Titanic was built by professionals.
If you have to start over, have a friend by your side.
Remember that the woodpeckers INSIDE are often a bigger threat than the storm outside.
No matter how bleak it looks, there's always a rainbow on the other side.
DON'T MISS THE BOAT !!!!
So here we are, I'm in my store, waiting for customers who love sewing as much as I do! A few have been trickling in, I'm waiting for the flood! Just like Noah, but I hope I don't have to wait 100 years.
Here is a great list I'd like to share.
Everything I need to know I learned from Noah
Plan ahead. It wasn't raining when Noah built the ark.
Stay fit. When you're 600 years old, someone might ask you to do something REALLY big.
Don't listen to critics. Do what has to be done.
Build on the high ground.
For safety's sake, travel in pairs.
Two heads are better than one.
Speed isn't always an advantage. The cheetahs were on board, but so were the snails.
If you can't fight or flee--float.
Take care of your animals as if they were the last ones on earth.
Don't forget that we're all in the same boat.
When the doo-doo gets really deep, don't sit there and complain--shovel!
Stay below deck during the storm.
Remember that the ark was built by amateurs & the Titanic was built by professionals.
If you have to start over, have a friend by your side.
Remember that the woodpeckers INSIDE are often a bigger threat than the storm outside.
No matter how bleak it looks, there's always a rainbow on the other side.
DON'T MISS THE BOAT !!!!
Monday, February 15, 2010
I haven't been at the Sewing Machine for weeks:(
But I'm happy to say that someone has been keeping busy! My son was involved with a group that recreated certain periods in history and his interest in knights and armor really grew. He has created several garments that would have been worn in the 1000s; that means natural fiber and all sewn by hand.
 I went down to the sewing room to trace out a Burda Pattern and this is what I found on my sewing table.
This is "Scale Armor" kind of an apron that would protect the wearer's torso. It is completely made by hand. The metal plates are cut, the sharp edges grinded and three holes punched. They are hand sewn to heavy canvas in a woven pattern to inhibit sharp objects from penetrating. This is what it might have looked like: http://www.polandbymail.com/get_item_jk503_full-size-hussar-fish-scale-armor-helmet-with-stan.htm
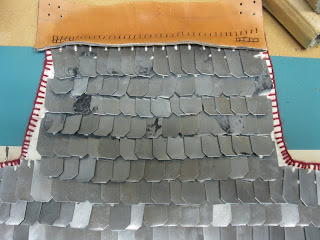


This is "Scale Armor" kind of an apron that would protect the wearer's torso. It is completely made by hand. The metal plates are cut, the sharp edges grinded and three holes punched. They are hand sewn to heavy canvas in a woven pattern to inhibit sharp objects from penetrating. This is what it might have looked like: http://www.polandbymail.com/get_item_jk503_full-size-hussar-fish-scale-armor-helmet-with-stan.htm


I am amazed by his hand work, I showed him how to do a buttonhole stitch quite a long time ago and you can see he makes use of it here to finish the edges of the canvas. I guess sewing does run in the family!
Sunday, January 31, 2010
Does it take 2 weeks to make 5 buttonholes?
It does when you are in the middle of inventory! At last it's done so I will have a little more time for sewing! I have posted the review over on Pattern review, just click on the icon. I was pleased with the full bust alteration on the shell and needed to add the same to the cardigan. I played a little with the placement and set the dart in the arm instead of the same as the shell. I drew the lines from the bust point to the hem and armseye, cut and spread the pattern as before. I pivoted the dart created into the armseye.


Here you can see the new dart I drew, again, it doesn't go to the bust point. I also added a rounded back alteration. I drew a horizontal line where I am the most round. I added a line into the shoulder seam and cut
the pattern across the horizontal line leaving a hinge. You can see it here. I smply added a dart into the shoulder seam. Fits quite nice!

Sunday, January 17, 2010
Full Bust Alteration Easy Peesy!
Over the past couple of years I’ve been working on ways to have the clothes I spent my precious time making actually fit! The “Big Four” continually draft patterns for a lady with a “B” and I am a D+. I used to add a little here and there, no wonder I didn’t end up with professional results. This is a sleeveless shell, drafted with no darts. Had I made it as is you would see the fabric pulling from the underarm or side seam to the bust. Perhaps you have seen this on yourself or others while, dare I say it, people watching at the Mall.
Here is my tutorial on how to turn any top without darts into a top with darts and, yes, T-shirts should have darts. Start by drawing three lines on the pattern, from the arm to the bust point, the side to the BP, and BP to hem.

Cut the tissue from hem to BP, BP to arm, leaving a hinge (reinforce with tape). Cut from the side seam to the BP, leaving a hinge. Spread the cut edges apart. You can see I spread an inch. Put some extra tissue or paper underneath and glue everything down so it doesn’t move. True the bottom hem. Draw the dart. Just a word of caution, you don’t want the dart to go right to the bust point, things will be too “pointy”.


Here is the completed shell which is part of a twin set I am working on. I will show how to move the dart on the cardigan and add a rounded back alteration.
Have a very busy week coming but I will post when I can.
Here is my tutorial on how to turn any top without darts into a top with darts and, yes, T-shirts should have darts. Start by drawing three lines on the pattern, from the arm to the bust point, the side to the BP, and BP to hem.

Cut the tissue from hem to BP, BP to arm, leaving a hinge (reinforce with tape). Cut from the side seam to the BP, leaving a hinge. Spread the cut edges apart. You can see I spread an inch. Put some extra tissue or paper underneath and glue everything down so it doesn’t move. True the bottom hem. Draw the dart. Just a word of caution, you don’t want the dart to go right to the bust point, things will be too “pointy”.


Here is the completed shell which is part of a twin set I am working on. I will show how to move the dart on the cardigan and add a rounded back alteration.
Have a very busy week coming but I will post when I can.
Subscribe to:
Posts (Atom)